
If you are reading this article, then you probably have the same needs that I had when I first searched for this solution. I have decided to write this article to simplify your search and to write down the simple steps required to mock a server or API request in Chrome.
TLTR; Chrome has the ability to override network requests directly in the chrome developer tools source tab. Scroll down to this article to the “Summary” section to see a quick list of steps or read the following post to see the details of this feature.
The problem
Before we can try to explain how to solve the problem, we should introduce an ideal scenario so that all readers are able to understand how this feature could help them.
The scenario of needing to override a specific API endpoint is very common during day-to-day development. This could either be because you are waiting for an API to be written by a different team, or test a specific scenario returned from an API endpoint and need to modify the returned value or even better try to overcome CORS issue when testing a site that does not whitelist localhost.
No matter the reason, modifying an API request has never been straightforward until now. As I mentioned above, it is not the first time that I have encountered this issue, but it is the first time that I have not actually used a third-party application, and just quickly made my required changes directly in the Chrome Developer Tool.
There are many tools used to mock API, mockapi, mockoon and postman are just a couple of the available software out there. These softwares are useful to create full APIs and should be your solution in the case in which you need to mock a full set of endpoints, but when the need is very limited a third-party software may be too much. Even if these tools have a really good UX. Setting up an account, learning how to get things started and implementing your API may still be overkill compared to the simple steps that we will cover in the next few chapters.
Setting up a testing situation
In this chapter, we are going to set up a testing scenario that we will use to implement our “network override” in google chrome. In the case in which you may already have a similar scenario, you can jump to the next section and see how to solve your problem.
Our codebase will have the following:
- A simple app (in our case running on codesandbox)
- A fetch API that tries to access an unexisting endpoint.
- A fetch API that tries to return an JSON object
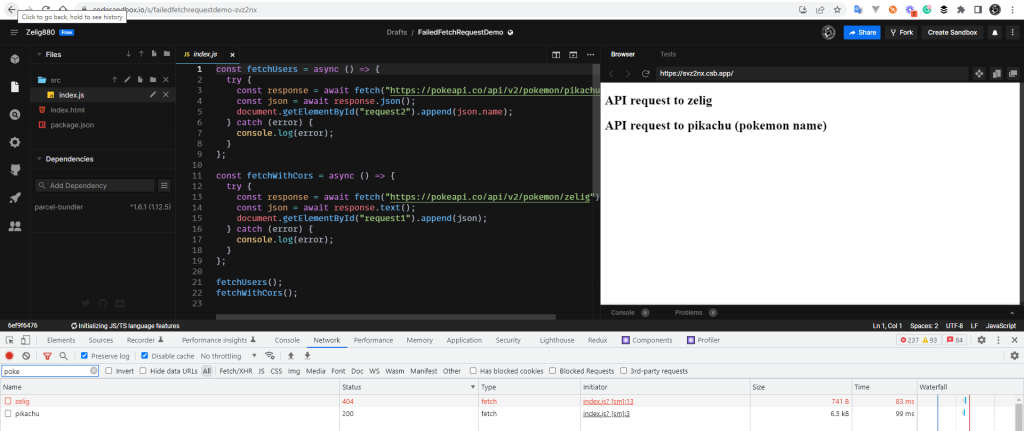
Luckily for you, all of this can be found at the following sandbox:
- Link to the sandbox code: https://codesandbox.io/s/failedfetchrequestdemo-svz2nx?file=/src/index.js
- Link to the deployed sandbox: https://svz2nx.csb.app/
Mock an API endpoint in Chrome
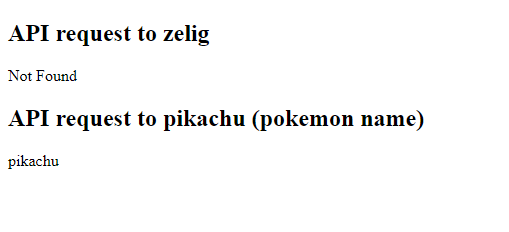
The first endpoint we are going to mock is the one that is currently returning a 404 error trying to fetch a pokemon that does not exist “zelig”.
The steps required to mock our API the following, but do not worry we are going to cover each of them in details with screenshots:
- Find the network request in our chrome Developer Tools
- Open it in a new tab
- Setup override folder (once per machine)
- Override it
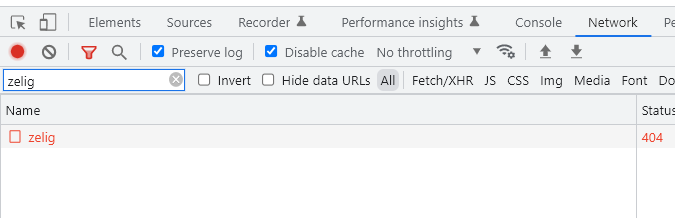
Find the network request to override in the developer tools
The first step required is to find the network request that we want to override. In our case the request is easily found as it is triggering a 404 error, but we can override any network request we want.
Before we can start we need to access our website: https://svz2nx.csb.app/
Then it is time to open up the Developer tool. THis can be done by using Option + ⌘ + J (on macOS), or Shift + CTRL + J (on Windows/Linux).

The developer tool has many tabs but in our case we are going to investigate the network tab, as it includes all the network requests that our site triggers while we navigate through it.
The devtools is just going to show the request that have been made since we opened it, so we should refresh out page to make sure that all the request are shown, and more importantly our 404 request. but before we do that we should click on the Network Tab.
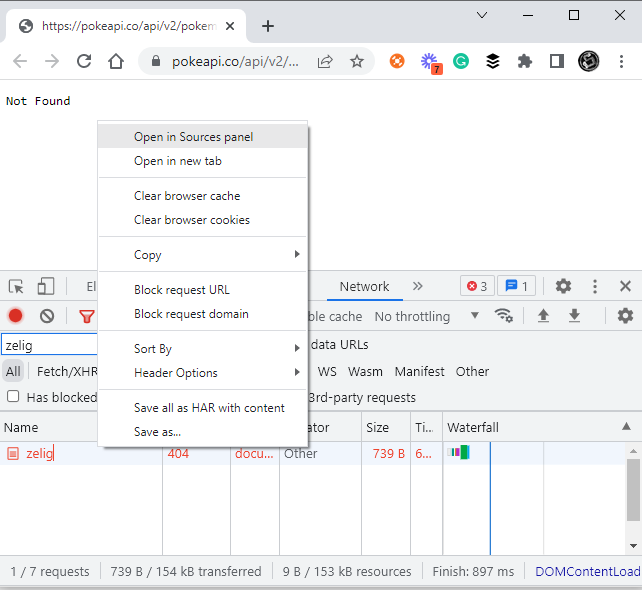
To simplify our research I have filtered for the word “zelig” as shown in the screenshot below.
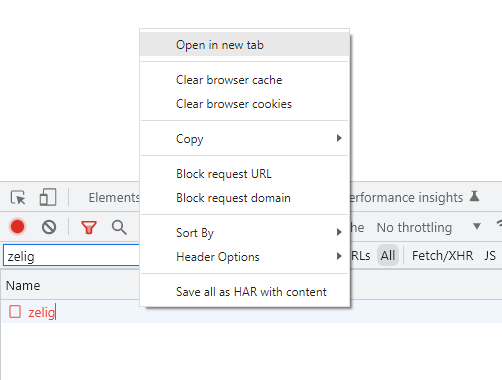
Open it in a new tab
Now that we have found our request, it is time to open it in a new tab. Unfortunately, this step is necessary for us to mock our API.
To be able to open our request in a new tab right click on it and select “open in a new tab”:
Our page will show a 404 “Not found” page as it does not exist. As you may have probably noticed, the new page opened without the Chrome Dev tool. So before we can continue, we will have to open it up again, as shown above, and refresh the page.
Setup override folder (once per machine)
It is now time to override our API request, but before we can do so there are a couple of small actions that have to be implemented once for each machine.
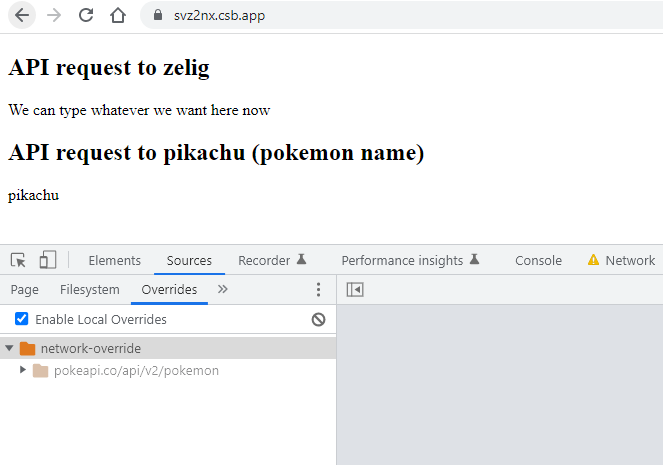
First we need to create a folder that we are going to use to save our mocked API. In fact, when we override a network request, Chrome is actually going to save it on our filesystem as an actual file (named as our request). In our example we are actually going to use a folder called “network-override”. It is important to realise that Chrome will get full access to this folder and we should not use a big folder such as desktop, download or documents.
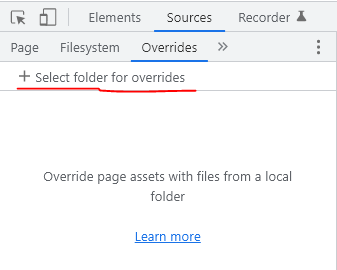
Now that we have a folder ready, we are going to setup chrome to use that folder for all the override. To do so, click on “sources” -> “overrides” -> “+ Select folder for override” as shown below
After selecting the folder, chrome is going to ask to receive the privileges to read and write on this folder. The override will not work unless chrome has access to the folder. Below is a screenshot from a windows machine:

After we provide access to the folder, our “override” tab sidebar will look something like this:
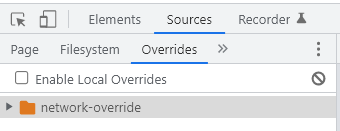
Our next step is to actually enable the local override. As the above screenshots shows, enabling this feature is quite simple as we just need to check the “Enable Local Overrides”. This option is provided to provide a very quick way for developers to enable and disable the override saved within the “network-override” folder.
We have now reached the end of the steps that need to do just once to setup this feature. Chrome is finally ready to mock our API request (and so will be all future request that need overriding).
Override it
Our next and final step requires us to open our network request within the source tab. There are different ways to achieve this, but the most simple way is to right click on our request and click on the “Open in source panel” option:
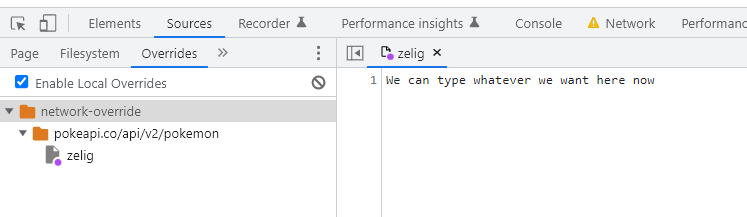
The network request will open up in the source panel, and will be ready to override. After making changes we just need to save either by clicking the right button and selecting “Save for overrides” or by using your operating system saving shortcut.
In the following example we have changed the text returned by the API request with some custom text and are ready to save:

After saving, our overridden request will show on the sidepanel. The name of the folder is going to be the endpoint and the name of the actual file is going to be the specific request we overridden:
Test it
It is now time to actually test our mock API, and there is no better way to do so, than by accessing our codesandbox deployment.
I expect the above screenshot to actually be a disappointment to you, as the request that we have overridden, is actually not working as expecting. But in reality everything is as expected.
When we mock a new API, it will not automatically work on all sites, and the “Enable local override” button need to manually be checked for it to work. This is a failsafe that makes sure that you do not unexpectedly override an important endpoint and have it always overridden.
So to see if our mock actually works we need to open the chrome dev tool, enable the override and refresh:
Well DONE! The request has now been updated and it will be updated on this site as long as we have the chrome debugger open. In fact, the override do no work if the chrome debugger is closed (also this is a security feature).
Summary
The above post was quite descriptive and had lots of screenshots to help you through the process, but in reality, update an API it is quite simple, even simpler if you have already covered the steps to update one endpoint before (as we have done in this case).
To summarize what we have done, and also to provide you a quick guide, we are going to override the second network request by changing Pikachu name to Simone 🙂
The steps are:
- Access the codesandbox endpoint
- open the Chrome Debugger and refresh
- Open the Network Tab
- Open the network request in a new tab
- Open the debugger again in the new tab and refresh
- Access the network panel
- Right click on the network request and open in the Source panel
- Override the content of the request (in our case the pokemon name)
- Save
After following the above steps we should be able to see the name Simone in our codesandbox deployment and a new entry in our override sidebar:
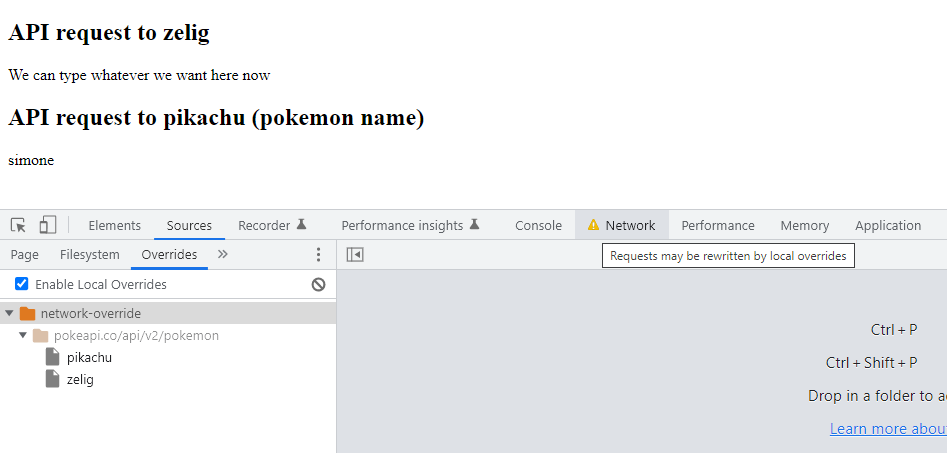
Another Well Done! Our second request has been updated.
The above screenshot also highlight that the network tab will inform you if any of the request has actually been served from the local Override as shown from the Warning Icon and the tooltip shown on hover.
Conclusion
I have been using this feature even since I found it and I really hope this blogpost is going to help you too. I know that the first part may have been too verbose, but it is one of those topics that is better explain in details, to avoid people getting lost in the process.
Please feel free to provide any comment to enhance the post or comment below if you found this useful for your own projects.
Nice idea, but is there a way to make it work for graphQL apis (or specific POST calls)? it seems that it overrides all the calls made to that endpoint (which inc ase of graphql is the same for all queries, the difference being only the actual payload)
You are right Gabi, this method does not seem to be usable with Post requests (mainly because it requires you to open in a new tab from What I can see).
I will keep investigating and trying to find more info in Chrome documentation, but if you find anything, please share it back as I will happily add it on the article!
I tried for POST call and it works for me. I just opened the website from same tab and all the POST calls with same URL returned back from mock
thank you so much for following up! This is great news! 🙂
I am using this feature so much since learning about it! Every time I get told that the APi is not ready I just ask for a sample return and the problem is solved! 🙂
Thanks a lot for this useful guide.
I’d like to share the trick for Windows users that are trying to mock a call to a URL containing query parameters. E.g.: /example/endpoint?some=param
For Linux or OSX users it’ll not be an issue because filenames can contain “?” symbol and the file named “endpoint?some=param” can safely be created. However, on Windows, it’s prohibited because “?” is a reserved symbol. To solve the problem the file has to be named “endpoint%3Fsome=param”. Chrome is smart enough to use this file as a mock for a matching HTTP request.
To convert reserved symbols into their encoded alternatives “encodeURIComponent” function can be used directly from the browser console.
For example “encodeURIComponent(‘?’)” will output “%3F”.
Thank you for the info!