
VitePress is a powerful documentation tool for web development that aims to provide a fast and efficient development experience. In this tutorial, we’ll explore how to deploy a VitePress project to GitHub Pages, allowing you to showcase your web applications to the world with ease.
Prerequisites:
Before we begin, ensure that you have the following:
- A VitePress project: Create a VitePress project following the great official tutorial
- Git installed on your machine.
- A GitHub account.
Step 1: Enable GitHub Pages an the site
GitHub Pages Deploy Action automates the deployment process, making it seamless. We can enable GitHub Pages directly from GitHub Dashboard by following these steps:
- Access the repository “settings” from the top navbar:

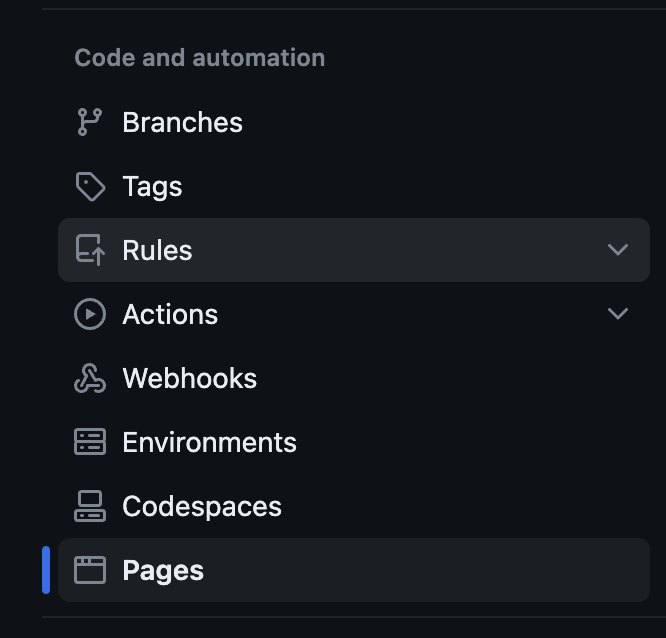
2. Click on pages form the sidebar settings menu within the “code and automation” sub-menu:
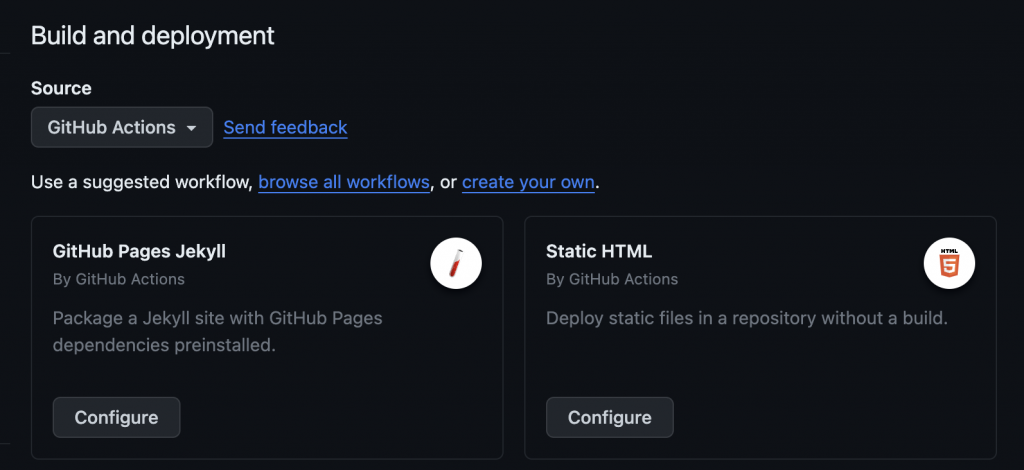
3. Now we must select “GitHub Actions” within the “Build and deployment” menu as shown below:
Step 2: Setup GitHub Pages workflow
We are now going to setup a workflow file that will be used by GitHub pages to deploy your site. The workflow is going to pull the code, build it, upload the artifacts and then deploy the site to GitHub pages.
First we need to create a two folders:
.github/workflows/
Depending from your current project structure you may not have any .github or workflows folder yet.
Now it is time to add our deployment file within the workflows folder called github-pages-deploy. The content of the file will be the following:
name: Deploy to GitHub Pages

on:
  # Runs on pushes targeting the default branch
  push:
    branches: ["main"]

  # Allows you to run this workflow manually from the Actions tab
  workflow_dispatch:

# Sets permissions of the GITHUB_TOKEN to allow deployment to GitHub Pages
permissions:
  contents: read
  pages: write
  id-token: write

# Allow only one concurrent deployment, skipping runs queued between the run in-progress and latest queued.
# However, do NOT cancel in-progress runs as we want to allow these production deployments to complete.
concurrency:
  group: "pages"
  cancel-in-progress: false

jobs:
  # Build job
  build:
    environment:
      name: github-pages
      url: ${{ steps.deployment.outputs.page_url }}
    runs-on: ubuntu-latest
    steps:
      - name: Checkout
        uses: actions/checkout@v3
      - name: Set up Node
        uses: actions/setup-node@v3
        with:
          node-version: 18
          cache: 'npm'
      - name: Install dependencies
        run: npm install
      - name: Build
        run: npm run docs:build
      - name: Setup Pages
        uses: actions/configure-pages@v3
      - name: Upload artifact
        uses: actions/upload-pages-artifact@v2
        with:
          path: ./.vitepress/dist
      - name: Deploy to GitHub Pages
        id: deployment
        uses: actions/deploy-pages@v2
The beauty of using GitHub Action is that it has all access required for it to run and it does not require any token creation or access.
This workflow will trigger on every push on main that is usually triggered by PR merge. If successful the workflow will end with an artifacts that can be downloaded and analysed and a site fully deployed to the GitHub Pages website link it is usually “https://YOUR-GITHUB-ID.github.io/REPOSITORY-NAME/. This can also be found within the “pages” settings.
Step 3: Configure VitePress for GitHub Pages
Before we move forward there is one more change that we need to make. This is required to make sure that the site links and redirect works correctly, but it is not required if you are going to setup a custom domain or if the site is deployed to the base of the domain.
Open your config.mjs file within the .vitepress folder and add the following configuration to set the base path for your GitHub Pages:
export default defineConfig({

  base: "/your-repository-name/",

});
Replace ‘your-repository-name’ with the actual name of your GitHub repository.
Step 4: Commit and Push Changes
Commit your changes and push them to the main branch of your GitHub repository.
bashCopy code
git add . git commit -m "Configure GitHub Pages deployment" git push origin main
Step 4: Check Deployment
Visit your GitHub repository, go to the “Actions” tab, and you should see a workflow named “Deploy to GitHub Pages” running. Once it completes successfully, your VitePress project is deployed to GitHub Pages.
Conclusion:
Deploying a VitePress project to GitHub Pages is a straightforward process with the help of GitHub Actions. Now you can share your web applications with the world, showcasing your development skills effortlessly. Happy coding!