
It has been a few months now since VueJs 3 has become the current version of this fantastic framework and with it, lots of new features. In this post, we will cover a feature called <teleport>.
This feature was previously available in Vue 2 in a plugin called “portal-vue“. Thorsten Lünborg a core contributor of Vue js, created and maintained this package. Luckily for us, this great tool has been imported within the core library and it is available out of the box since Vue 3.0.
What is <teleport>
On the official documentation the Teleport is explained as:
https://vuejs.org/guide/built-ins/teleport.html
<Teleport>is a built-in component that allows us to “teleport” a part of a component’s template into a DOM node that exists outside the DOM hierarchy of that component.
This feature allows us to transport HTML into a different part of our page, giving us the possibility to write very clear and accessible code. The main problem with new features like this is that due to the fact that they were not available until now, we may have never encountered a use case that required this feature, but since its existence, within VueJs 3 I have personally used this more and more.
A couple of very common examples of the use of Teleport are:
- Dialogue Boxes
- Toast components
- Bottom Sheets
- Tutorial overlays
- <head> SEO content
Another very useful usage of Teleport is on applications in which Vue Js may just be a small part of the full page. This can either be because Vue has been added to a legacy code, or because of actual architecture like in the case of a Laravel application. I have found it very useful in these cases to use the Teleport to be able to define <head> parameter required for SEO without the need to create any hacks.
How does it work
Let’s create a very simple HTML to show how this feature works. For simplicity, all text is currently hardcoded:
// toast.vue
<template>
  <div>
    <h2>Toast</h2>
    <p>Message</p>
  </div>
</template>
The first step required to use the teleport is to wrap the HTML that we want to move in the build-in component called <teleport>. So in our case, it will look like this:
// toast.vue
<template>
  <teleport>
    <div>
      <h2>Toast</h2>
      <p>Message</p>
    </div>
  </teleport>
</template>
The second step is to define the property called “to” available within the <teleport>. This property expects a CSS selector or an actual DOM node. In our example, we are going to transport our component to the body:
// toast.vue
<template>
  <teleport to="body">
    <div>
      <h2>Toast</h2>
      <p>Message</p>
    </div>
  </teleport>
</template>
If we open the above code in the Vue playground (link here) we can see that our HTML has been moved out of the Vue application (defined by the id=”app”) and it has been appended to the body.
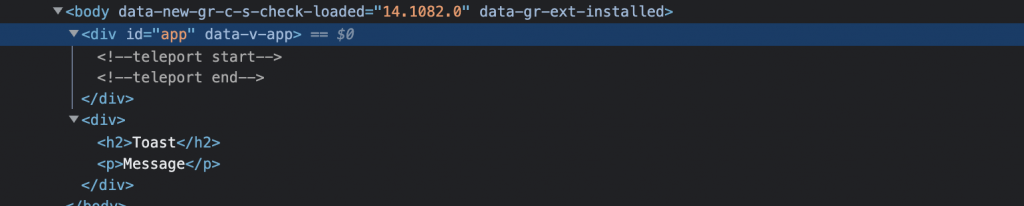
Another nice detail to highlight is that when using the teleport, the framework will create Comments within the code to show the user that a specific code that should have been rendered in the HTML is not there anymore. In the screenshot above, we can see that the content of the Vue app has two comments, <!-- teleport start--> and <!-- teleport end--> delimiting where the Teleport HTML should have started and ended.
It is important to also note that even if the HTML has been moved out, the component itself and any of its children are still part of the Vue application and will show correctly within the Vue developer tools.
Before we move into the next section and create a real-life example, let’s summarize what we have learned so far about this feature:
- It can be used as the root of a component
- It creates comments in the HTML to help us debug and understand our code
- It does not affect the flow of the component
Build an SEO component with Teleport
In this section we are going to create a useful component, different from the one provided in the Vue documentation, to help you grasp and understand this feature further.
The component that we are going to create is going to enable us to control our application metadata from any component. This is a common use case as it is common for a specific component, for example, a blog post component, to have to define some specific metadata for social media purposes (defined as the image and description shown when a user share the article on social platforms).
Create a basic metadata component
The first step requires us to create a simple Vue component. For the scope of this tutorial, this component is going to accept a single “name” and “content” property.
//SuperMeta.vue
<template>
  <meta :name="name" :content="content" />
</template>
<script setup>
const props = defineProps({
  name: String,
  content: String
})
</script>
I have used the composition API using the <script setup> syntax as it is the current default offered by the Vue playground, but this feature also works correctly when using the Option Api.
Use our newly created SuperMeta.vue component
We are now going to create a simple blog component that will make use of our newly created SuperMeta.vue file.
//blog.vue
<template>
  <article>
    <h2>The title of the article</h2>
    <p>The content of the article</p>
  </article>
  <SuperMeta name="author" content="simone cuomo" />
</template>
<script setup>
import SuperMeta from './SuperMeta.vue'
</script>
Also, in this case, we have created a very simple component for demo purposes. Our component is going to have a heading, a content and it is also going to create HTML metadata containing the author of the blog.
If we render the above component, it will create the following HTML:
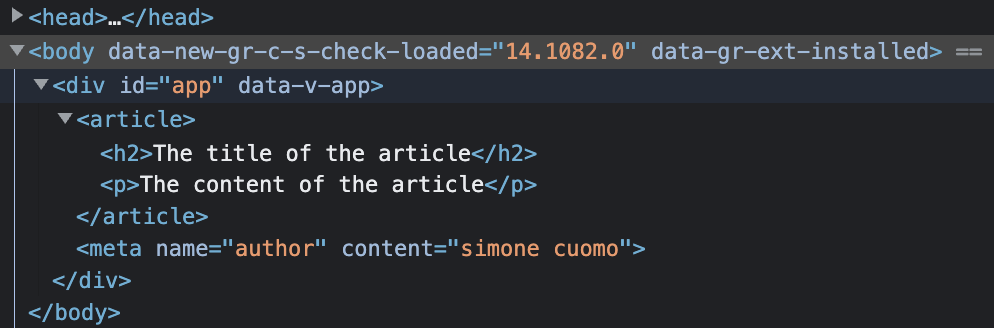
As the above screenshot shows, our article and our metadata are working as expected, but unfortunately, our <meta> is not in the correct place as it is currently placed outside of the <head> and it will not be read and used by search engines and social media platforms.
To solve this issue we are going to use Teleport. As shown before, to be able to successfully move our HTML, we just need to wrap any part of the DOM that we wish to move using the <teleport> element. In our case we are going to wrap the <meta> element within the SuperMeta.vue as shown in the code below:
//SuperMeta.vue
<template>
<teleport to="head">
<meta :name="name" :content="content" />
</teleport>
</template>
<script setup>
const props = defineProps({
name: String,
content: String
})
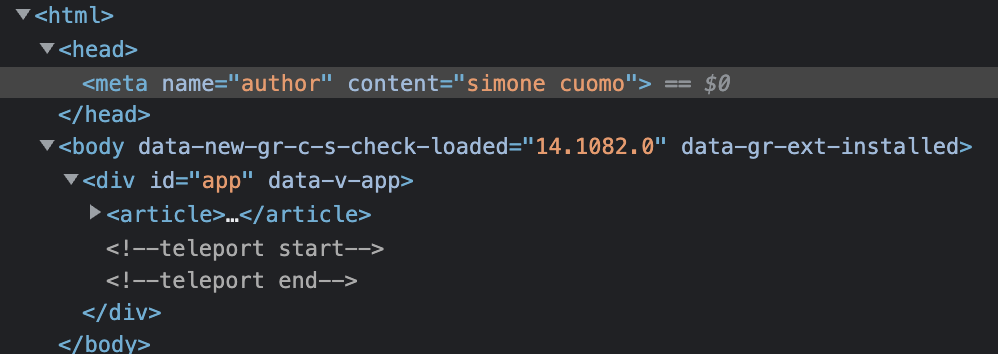
</script>As previously mentioned, when using teleport we are also required to provide a destination parameter using the “to” props. In our scenario we would like the HTML to be transported within the HEAD. Using the above code will successfully move our HTML into the correct place of the DOM:
Multiple instances of Teleported DOM
In the above example, we have successfully used our teleport and moved our Metadata in the head. In a real-life example, a developer may require to move more than just one entry within the head and not just one.
Luckily for us, the teleport feature can be used multiple times without affecting its result. I usually compare the teleport to a simple “append()” method, so using it multiple times will just append the HTML one after the other to target CSS selector. Please not that the element will be added/transported following the same order in which they are rendered.
Let’s conclude our example by adding a couple of metadata to our application.
//blog.vue
<template>
  <article>
    <h2>The title of the article</h2>
    <p>The content of the article</p>
  </article>
  <SuperMeta name="author" content="simone cuomo" />
  <SuperMeta name="description" content="A very nice article" />
</template>
<script setup>
import SuperMeta from './SuperMeta.vue'
</script>
As expected, the above component will render two pieces of metadata within our head and the two comments to inform us that some content was moved from the DOM (below article) and moved somewhere else. The two metadata are added in the same order that we have added then in the code.
The following screenshots show the output of the above code (link to the working code at the end of the post).

Summary
In just a few lines of code, we were able to create a very useful component. The Teleport feature is very powerful and can really help create a clean codebase. This feature is very simple to use, but it takes some time to understand when to actually use it. As I previously mentioned I never used anything similar in Vue 2 as I never thought to have the need for it, but since I started to use it a few months ago, I have started to realise how powerful and useful this actually is.
The link to the Vue playground for the above codebase can be found here: Playground Link.
As with all my posts, please do not hesitate to comment below if you have any further information that you would like to add, or if you have found more interesting ways to use this feature and would like to share it with the rest of the Vue community.