

The web is full of fantastic tutorial, all explaining how to easily create a full Continuous integration pipelines using new services such as AWS, Firebase and Azure.
Unfortunately, there are still lots of project still hosted on simple shared host environments like Ionos (former 1and1), GoDaddy and Hostpapa.
This hosts are great for the value for money, but unfortunately they miss the “simple” integration offered by other cloud services.
In this post we are going to cover all the steps necessary to fully implement an automatic deployment from Github/BitBucket directly to a shared host (in Our case Ionos) using CircleCI
CircleCI
There many tools out there able to provide you the tools necessary to create a full CI lifecycle, such as Jenkins, Travis, but I am very fond of circleCI due to their good example and simple UI.
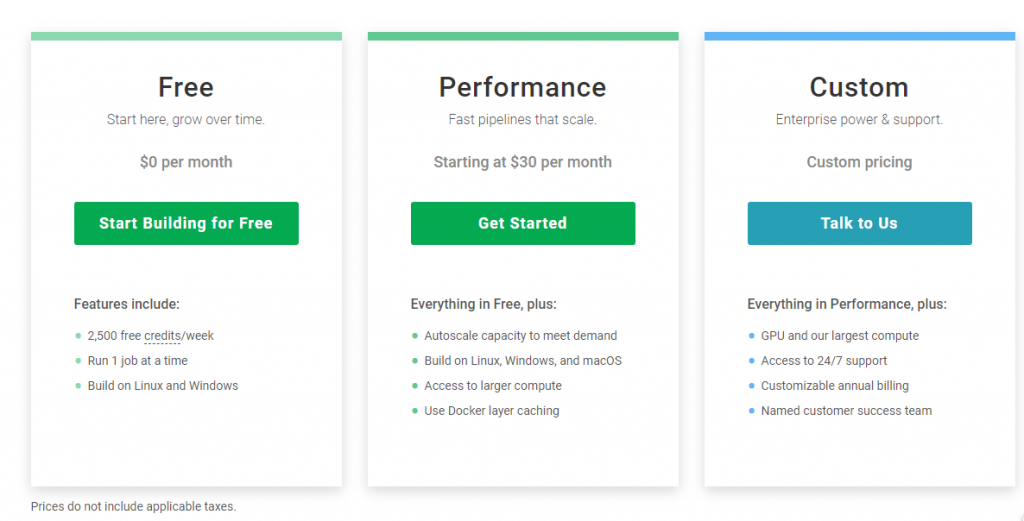
Another great advantage of CircleCI is the free tear, that is more than enough for personal/small projects. The initial tear offers 2500 credit a week with one Job indefinitely.
CircleCI can easily integrate with Github and BitBucket straight out of the box. Setting up a new project is quite simple, and it just takes a few steps as shown on the official website: https://circleci.com/docs/2.0/getting-started/
CI pipeline
All the power of CircleCI lies within the configuration yaml that lives within a specific repository. This file includes all the information necessary for the deployment. In our case we have the following steps to complete before our pipeline is completed:
- Setup the Config.yml
- Setup Git FTP
- Set Environment variable in CircleCi
Setup Config.yml
The first step required is to setup a config.yml for our circleCi to use and work. This file, lives within a folder called .circleci within the root of our repository.
The following file is all CircleCI need to know what to do:
version: 2
jobs:
  deploy:
    docker:
      - image: circleci/node:8-browsers

    working_directory: ~/repo

    steps:
      - checkout
      - run: npm install
      - run:
          name: Deploy Master Branch
          command: |
            sudo apt-get update
            sudo apt-get -qq install git-ftp
            echo "Deploying project ..."
            git ftp push --user "${username}" --passwd "${password}" ${ftp_location}


workflows:
  version: 2
  master-deploy:
    jobs:
      - deploy:
          filters:
            branches:
              only: master
If you have ever seen a config.Yaml file, you will notice, that the above is a very simple configuration, but it is now time for us to go over some parts:
First we need to set up the Docker image that we are going to use. In my case I needed Node to build the SPA, therefore I am loading a node environment:
    docker:
      - image: circleci/node:8-browsers
Second, it is time to define the steps of our Job. This can vary from project to Project. In the above case we are going to:
- Checkout the branch (we will define which branch later)
- Run
npm install - Fetch
Git FTPand use to to deploy to our shared hosting ( we will cover more of this later)
    steps:
      - checkout
      - run: npm install
      - run:
          name: Deploy Master Branch
          command: |
            sudo apt-get update
            sudo apt-get -qq install git-ftp
            echo "Deploying project ..."
            git ftp push --user "${username}" --passwd "${password}" ${ftp_location}
Lastly, it is time to define our workflow. In our case, it is a simple one, that just has one Job (the one defined above), and has a filter to run on a specific branch master:
workflows:
  version: 2
  master-deploy:
    jobs:
      - deploy:
          filters:
            branches:
              only: master
Setup Git FTP
The simplest way to deploy our site to our shared host, is to use Git FTP. This package, allows us to manage and deploy git repository by FTP.
The difference between this and a normal FTP is the ability to DIFF branches, commit, by just uploading the file that have changed since last deploy. Before we can start and use this on our CircleCI workflow, I suggest to initialise it locally. This step is NOT required, but from my own experience, it can make the overall command and setup easier.
You can get the instruction to fetch Git FTP for your own operating system from the official website: https://github.com/git-ftp/git-ftp.
The GIT FTP has 3 commands:
- Init: This will upload ALL files to your FTP and record the first deployment hash.
- Catchup: It assumes that you have uploaded all file already. Using this command will “Update” the
.git-ftp.logwith the current commit (this is useful if it is an existing project) - Push: This command is used to push new files into an ongoing production.
As shown above, depending on your situation (new or existing project), you may need to use one of the following two commands:
git ftp init --user "MyUsername" --passwd "MyPassword" ftp.path.com/public_html
git ftp catchup --user "MyUsername" --passwd "MyPassword" ftp.path.com/public_html
After this, our Git FTP is ready to be used, and we can therefore continue our configuration by setting up the information used above within circleCi environment variables
Set Environment variable in CircleCi
In the above command, we had to “hardcode” out FTP information. This is surely not something that we want to add within out Config.Yml file, as it is pushed within our repository.
CircleCi offers the possibility to set environment variables. These are going to replace string delimited by the following syntax ${myVariableName} within your config.yaml file (as shown above, where we already defined username, password and Ftp location).
To setup an environment variable in CircleCi, click on the Project settings on the top right of the screen

Then it is time to select Environment Variables from the left hand menu

Now you can easily setup your variables, making sure that the name set is the same as the one defined within our config.yml file.
Deploy
Everything is now set and it is time to actually deploy our application using our new pipeline. This can be done by pushing our newly created config.yml file within our repository in the master branch.
If everything is being set correctly, your project will deploy in a few minutes after being pushed. CircleCi is fantastic in providing all the information necessary to debug and fix the deployment if anything is wrong.

The one shown in this article is just a simple workflow. CircleCI is not just used for deployment, but very useful to define full complex pipeline that may involve Unit tests, E2E tests and much more.