

Javascript has a bad reputation, and this is mainly due to the fact that it is too flexible to use. Many users would abuse this great feature of this language writing code that is very inconsistent and hard to follow. For example, simple inconsistency like single or double quote around strings, can make project seem quite unclear and messy.
In recent years, after I have been exposed to different languages that follow a more rigid approach to coding standards, I have started to focus to write cleaner Javascript, and I would like to share some of these experiences.
JavaScript, is especially prone to developer error due to its lack of a compilation process. Linting tools allow developers to discover problems with their JavaScript code without the need of executing it. In this article I will be going into details on how you can use and configure a lint utility to support you.
What is Eslint

Eslint is a pluggable linting utility created by Nicholas Zokas in June 2013, that can be used to analyse our Javascript code to highlight errors on the fly, supporting a quick and clean development.
There are many linters around, but I am listing below some of the reasons that have supported my decision to choose Eslint:
- It is open source.
- Great documentation.
- Huge number of configurations
- Good examples
- Works with all major IDE and Code editors.
- Can be used from the Command Line
- Works on Build Server
Getting started with Eslint
Eslint requires Node,js to be installed on your machine, so if you do not have it, please download the latest stable release from the main website.
Install
After Node.js is up and running, we can move to the next step by opening a Command Prompt and installing the Eslint package from NPM (visit the NPM website for more information regarding its usage).
npm i -g eslint
Configure
Following the installation above, we now have to define a configuration file called .eslintrc.json. Eslint comes with an handy feature to support you in creating this file. To trigger it, access the root location of your site and type the following command
eslint --init
This command will return three options:
- Ask a couple of questions to define the configuration required
- Use a popular styleguide ( this will require an existing NPM package)
- Inspect your Javascript Files (not suggested if your coding style is inconsistent)
The above will be displayed in the command prompt like shown by the image below:

For the purpose of this blog post, I am going to provide my own configuration file that need to be extracted in the root of your site. The file can be downloaded by clicking the following link:
Run the linter
After successfully complete the above steps, you will now be able to use Eslint by using its extensive CLI (command line interface) commands or within most of the major IDE (mode details to follow). The most basic command would just include the file or path to test, for example the following two example will respectively test file.js and all files within the “site” folder
 eslint "c:/site/file.js"

eslint "c:/site"
Configuration File explained
Now that we have Eslint fully configured, it is time to dive into the configuration file to see how a configuration file is structured, and what configurations are set in our setup. As mentioned above, there are hundreds of configurations, all well documented on the Eslint website.
Root & Environments
 "root": true, //this will set this file and folder as the root directoty
    "env": {//load common environment/plugin configuration
        "browser": true,
        "commonjs": true,
        "es6": true,
        "node": true,
        "jquery": true
    }
The first section of our configuration file includes the root setting. This is an optional setting that define the root of your project. Projects can have more than one Eslint configuration file, and when running it, it will search in the current folder and all its ancestors until it finds the root value.
The next setting used is the env (environment). Using this setting will load specific environment setting. For example in the case above we are allowing the use of ES6 notation, therefore we would not have any error triggered if using the arrow notation =>.
Globals
 "globals": {
        "exampleGlobalVariableName": true
    }
The global configuration accept a object that will determine global variables that we can use within our JS files, without the need to be declared. Failing to do so, will trigger a no-undef error.
For example, when we added jQuery in the env setting above, has indirectly set a global for $ and jQuery variables. This setting is really useful to support the user to understand unexpected dependencies that you may have, that will result in hard unit testing.
Rules
Most of the configuration have three simple settings.
- off – This configuration is self explanatory. It will switch the error off.
- warn – This setting will trigger a Warning error. In many IDE warning are displayed with a Yellow underline.
- error – This setting will return an error. A file could have some warning, but you should always aim for “error free” files.
Some specific rules have more arguments that can be used, but I will be wasting time trying to explain them, as the Eslint documentation is really complete.
Using Code Editors

Eslint CLI is fantastic, but I do not expect you to run it every single time you modify a file, and even if the linter gives you the line number for it, it would still be hard to use on a daily basis.
Luckily for us, Eslint is very easy to set up in most of the major code editors. In this section of the article, I am going to show how you install the linted on Visual Studio Code, that is my editor of choice.
Visual Studio Code
To use Eslint in the editor, we need to first install the official extension called ESlint. To access the extension page click the Extension button on the left menu or click Ctrl+ Shift + X (on windows).
After installing the above extension, you will be required to restart the editor for the effect to take place.
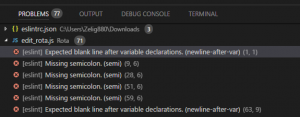
On restart, assuming your Eslint configuration file is in the correct folder, you will be able to immediately see errors highlighted in real time.
The screen shots below show some of the feature available when enabling the extension.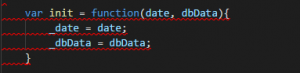

Conclusion
I have personally doubt the need for a tool like this, but now after using it, I cannot live without. The configuration that I have shared is a personal choice and I am more than happy for you to use it if you wish to, but at the same time, you should also dive into the available rules and see if there is anything that fit your guidelines.
Start to use a linter is just the first step to write cleaner code. No matter if you are a single developer or work in a big team. Introducing this tool will increase the quality and readability of your code. We have all been guilty of being sometimes lazy to keep our project consistent and lacking structure, but now the tools are available and we have no excuse but to start and write cleaner Javascript.