
This article is going to give you the basic knowledge necessary to start and develop your very own GraphQL API. This post is part of a series that will cover the full development lifecycle that lead to the creation of an example Github graphQL web app that can be found at the following link http://github-api-example.zelig880.com
What is GraphQL?
Before we dive into the actual details of graphQL, I am going to explain what GraphQL is, and what makes it so different from standards Restful API’s.
The actual definition of GraphQL defined on the official website is:
https://graphql.org/
GraphQL is a query language for APIs and a runtime for fulfilling those queries with your existing data. GraphQL provides a complete and understandable description of the data in your API, gives clients the power to ask for exactly what they need and nothing more, makes it easier to evolve APIs over time, and enables powerful developer tools.
To summarise, GraphQL offer great flexibility compared to standards API’s. Clients are able to define what they want from a server in a single query, without the need to have to jiggle around specific API endpoints.
If for example you would like to create a list of users with their relevant address in a restful API, you will probably have to create two specific endpoint request, one to fetch an User and the second to get the user address.
GraphQL makes client request easier, without the need to make major change on the backend ( the server could still implement a restful API behind GraphQL). The above example can be achieved with a single request in GraphQL in which the client can ask for a “User with address”.
Github GraphQL API

I have specifically chosen to use the Github GraphQL api, because it is easy to access ( it is quite simple to gain a “personal access token”), and it is free and it provides tools and documentation that support its use.
Personal access tokens
For the scope of this post, you are not actually required to use an access token. I am going to show how to gain one, as it is the first necessary step to be able to move your example query into a real app and it is important to know how to obtain one.
To gain a Personal access token, you must have an account with github ( this can be created for free at the following link: https://github.com)
Obtain the token, after you have created an account, is very simple. You just need to follow this link https://github.com/settings/tokens and click the “Generate new token” button.
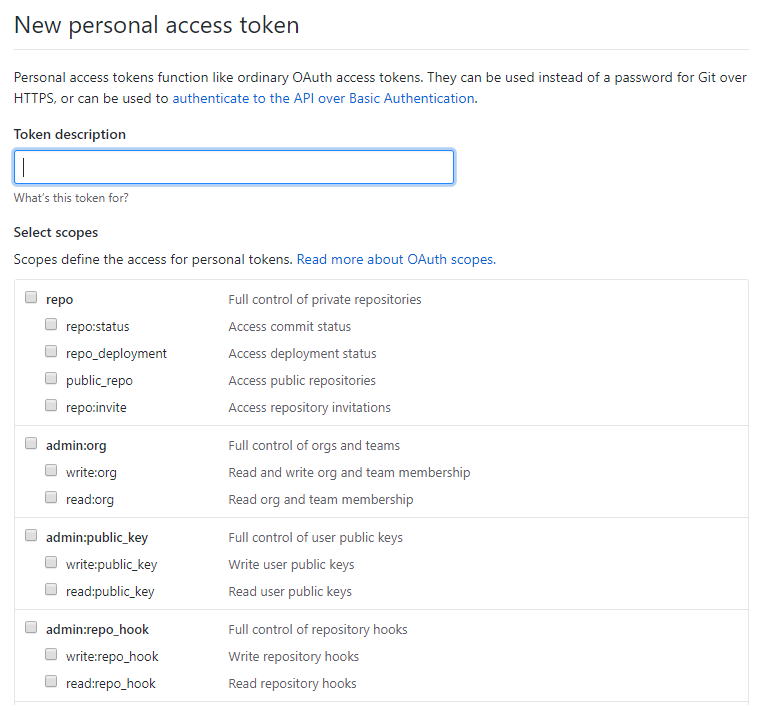
A token requires a Description, and a selection of access rules for your token. In this example we are going to query users, and we will therefore select the “User” scope.
Github GraphQL Api explorer
As mentioned above, one of the main advantages of getting started with the Github GraphQL api is provided by the tools provided to developers.
Github offer the ability to query live data, directly in the browser using their Developer explorer.
To access the explorer you just need to follow this link https://developer.github.com/v4/explorer/ and enter your credentials.
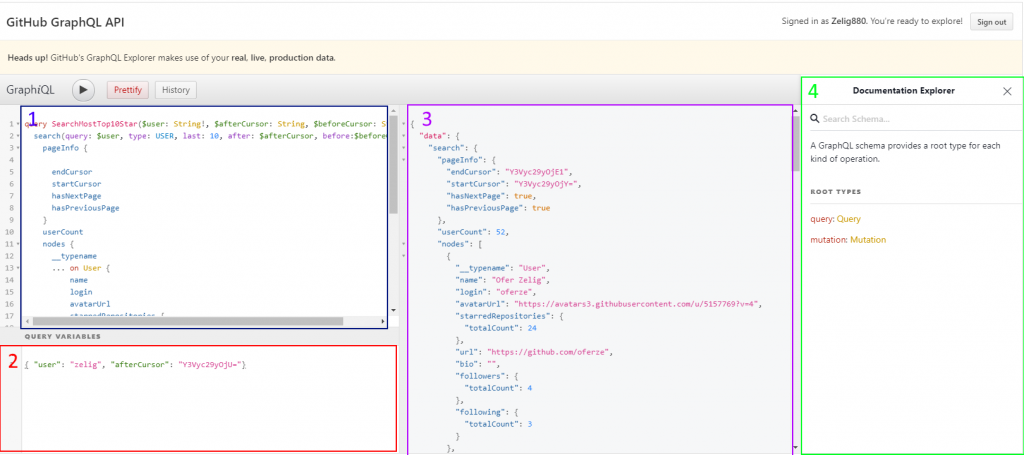
The explorer is divided in 4 section:
- Query window – Where we are going to define are GraphQL query
- Query variable window – This is going to include the dynamic variables accepted by our query
- A result window -This is going to show the returned query or a detailed error
- Documentation explorer – This window provide extensive documentation on all the API.
Document explorer

The first step is to get familiar with the documentation explorer. This is filled with autocomplete functionality and provides you with a Details, fields list, fields descriptions and a list of Fields that implements the given item. The picture provided shows the result for PageInfo.
Query
If you have ever used a standard Rest API before, you are going to be completely our of your conference zone. GraphQL uses a Json like query. In the following example we are going to search for the first 10, users that match a specific “query variable”.
query SearchTop10Users($user: String!) {
  search(query: $user, type: USER, first: 10) {
    nodes {
      __typename
      ... on User {
        name
        login
        avatarUrl
        url
        bio
      }
    }
  }
}
The query includes:
- Name: SearchTop10Users
- Variables: $user: String!
- Search paramethers: query: $user, type: USER, first: 10
- Expected return: node, name, login, etc..
As the above query shown, this is very different from conventional APi’s that had defined endpoint (eg. getUser). With GraphQL not only we are able to merge different queries together, but we are also in control on which fields get returned ( eg. just a subset of the user object).
Query variables
Running the above query, is going to result in an error, because our defined variable ($user) has never been defined.
In Gitbut GraphQL variables can easily be defined in the appropriate window. In our case we just need to specify a string for our $user. Variables are passed using a JSON object format.
{ "user": "Zelig" } Run it..
We have now completed all the required steps necessary to run our first GraphQL query in the explorer.
Github is going to save all different queries on your profile, providing an useful search. This queries can easily be copied in your application, using the Personal Access token generated above.
Conclusion
This post was aimed at providing you with a very first understanding of GraphQL and its power. Using the Github API has allowed me to understand its basic fundamental, without the need to create a full scaffolding around it queries ( no need to set up a project just to send the queries).
Github extensive documentation on the API, is very helpful to understand the different objects available within graphQL. like nodes and edges ( this may vary between different api’s).
In future posts I am going to implement the above query to create a full Vue application with the use of apollo.js.